Since there was no rain in the forecast today, I decided to take the robot out around the front lawn for a few tests.
I have decided to hold off on buying an old mower and hooking it up until I am sure the control/video feed will be adequate to drive this around the lawn with a mower attached... There are still a few problems to overcome. (More on that later).
The first video below is a description in pretty good detail of all of the components and how they work together on the robot.
This video is the second part, and gives some detail on driving the robot around, and a bit of a demonstration.
As you'll notice in the videos, I didn't compensate at all for the shakiness of the video feed... I mean it makes sense now. Fixed Camera + Bumpy terrain = Bumpy Camera. I'd prefer a software solution to fix the video's shakiness real-time. They are plenty of great options for post processing (Virtualdub and Deshaker), but those won't do me much good since I need a real-time stream.
I might be able to build a stabilizer that will help a bit, but thats my plan B for now.
The other problem right now with the robot is the oversenstivity of the joystick. I plan to correct this by replacing joystick control with an old PC steering wheel and brake/gas pedals. Right now though, its at the bottom of the list since it'll be an easy drop in fix, whereas the video takes a bit more thinkin'.
Sunday, August 14, 2011
Friday, August 5, 2011
First Joyride Around My Basement...
I took the robot 'out' for a spin around the basement now that I've got it all wire(less)ed up. I am pleased to report no major issues and no holes in the drywall!
I apologize for the terrible job video taping... its hard to drive a robot with one hand and video with the other, while you're trying not to destroy your walls.
Forecast is for rain the next few days, but as soon as it clears out, I'm going to do some tests out in the lawn to see how it fairs. You'll notice in the video the robot is a little back heavy (The front wheels seem to float). That is actually by design, as one I hook the mower to the front, it should even out a bit.
100101001100100101 (Source Code)
I decided to go ahead and share my work thus far via a google code project. I'm not exactly sure how useful any of this is going to be because my code is very much dependent on the Quickie P-220 wheelchair joystick which I've hacked... which means, in order to really use this code, not only will you have to get ahold of that particular wheelchair; but you'll have to hack into the controller in the same way I did... (And build the Arduino Shield I built... and Hack your wrt54g router... and... and....)
Get the picture?
Ok, enough chitter chatter. Here is the source code for both the Arduino and Java TCP Base station (Control Center):
Google Code Mowstation Trunk
Oh, also, I wanted to mention that I've solved my issue with the robot wandering off when power was lost... Previously I had the arduino powered through a portable energizer, and just the webcam and router powered through the inverter... which meant, I could lose power to the router, but the arduino would still stay on (And keep driving the motors).
I fixed this by purchasing a separate 12V battery from walmart for 20 bucks (Not the biggest battery in the world mind you... but it was a 'lawn and garden' battery, which seemed fitting for a robot mower). I then hooked the inverter up to that battery and made use of the two AC ports for webcam / router, and this inverter also has a USB port, which I plugged the arduino directly into.

Now I just need to start choppin' some metal and weld this beast together so that it can support the weight of a mower... this will be interesting.
Thursday, August 4, 2011
Oh Robot, You're a Needy Little Guy Aren't You?
I managed to make some fantastic progress with the whole wireless commanding of the robot... in fact, for the most part, that interface is done. As mentioned in the last post, I ended up going for serial commands over a TCP interface using a hacked wrt54g router and ser2net. My TCP client (Which has a joystick connected and is really the cockpit for the mower) was written in java and works very well. If anyone is interested in sourcecode, just let me know.

Isn't he a cutie?
The real challenge of late has been my revisit of powering the robot... I purchased a great cheap inverter off Amazon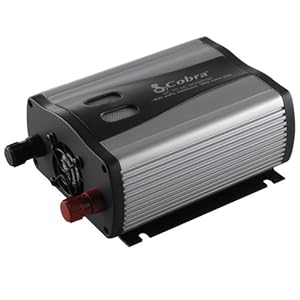 and tied it into the 12V batteries of the wheelchair. When I first powered it on, I thought I had just solved my last major hurdle, and was ready to attach a murderizingly dangerous spinning lawn mower blade and set this guy off to work... oh man. Thank God for testing.
I started up my TCP client and grabbed my joystick, time to tear rubber around the basement. I push the throttle forward and the robot takes off. Hold on... why is this thing beeping very loudly at me? I didn't install a speaker. Oh, its the inverter... I guess that's normal. Maybe its the robots way of communicating with me, "Let me go faster papa". Ok robot, whatever you want.... Throttle Up.... Oh good, the beeping stopped.... wait, why is the robot not stopping? Oh... Uh... Shit.
So, apparently the 12v battery does a great job at holding the robot at idle while running the inverter. The problem is, once the motors kick on, there isn't enough juice left to power the inveter... hence, my router, wireless camera and method of controlling & killing the robot remotely was lost. Fortunately, I tested with the robot in eyesight, and was able to run and hit the kill switch I'd installed on the robot itself, literally inches from another hole in the drywall.
I had thought I installed adequate safeguards incase this happened... but my command timeout was set to 4000 milliseconds. Which means, the robot will do a whole 4 SECONDS of ghost riding before shutting itself down when communication is lost. Plenty of time to drive through that wall, or demolish a family of bunnies. I'm changing the timeout to 50ms to prevent this mistake again.
As for my power situation, I'm going to get a cheap 12v 7ah battery on this thing to run my electronics... separate from the motor batteries. Hope it's enough to power an inverter.
Also, I've decided what I really need is more views of the robot while its cruising. So I decided to customize my own wide angle web cams. I bought a couple door peep holes from amazon for 6.99 that I'm going to hot glue to some old web cams I have stashed around, and send the USB commands over Ethernet back to the base station using this nifty gadget microcenter has on sale.


For now... the beast sleeps in the basement, ready to rise again soon.

The real challenge of late has been my revisit of powering the robot... I purchased a great cheap inverter off Amazon
and tied it into the 12V batteries of the wheelchair. When I first powered it on, I thought I had just solved my last major hurdle, and was ready to attach a murderizingly dangerous spinning lawn mower blade and set this guy off to work... oh man. Thank God for testing.I started up my TCP client and grabbed my joystick, time to tear rubber around the basement. I push the throttle forward and the robot takes off. Hold on... why is this thing beeping very loudly at me? I didn't install a speaker. Oh, its the inverter... I guess that's normal. Maybe its the robots way of communicating with me, "Let me go faster papa". Ok robot, whatever you want.... Throttle Up.... Oh good, the beeping stopped.... wait, why is the robot not stopping? Oh... Uh... Shit.
So, apparently the 12v battery does a great job at holding the robot at idle while running the inverter. The problem is, once the motors kick on, there isn't enough juice left to power the inveter... hence, my router, wireless camera and method of controlling & killing the robot remotely was lost. Fortunately, I tested with the robot in eyesight, and was able to run and hit the kill switch I'd installed on the robot itself, literally inches from another hole in the drywall.
I had thought I installed adequate safeguards incase this happened... but my command timeout was set to 4000 milliseconds. Which means, the robot will do a whole 4 SECONDS of ghost riding before shutting itself down when communication is lost. Plenty of time to drive through that wall, or demolish a family of bunnies. I'm changing the timeout to 50ms to prevent this mistake again.
As for my power situation, I'm going to get a cheap 12v 7ah battery on this thing to run my electronics... separate from the motor batteries. Hope it's enough to power an inverter.
Also, I've decided what I really need is more views of the robot while its cruising. So I decided to customize my own wide angle web cams. I bought a couple door peep holes from amazon for 6.99 that I'm going to hot glue to some old web cams I have stashed around, and send the USB commands over Ethernet back to the base station using this nifty gadget microcenter has on sale.
For now... the beast sleeps in the basement, ready to rise again soon.
Monday, August 1, 2011
Wires? We Don't Need no Stinkin' Wires.
Finally. This was a long time comin' but as of last night, the robot is finally completely wireless.
I managed to add a serial port to my already 'enhanced' WRT54GL Linksys router, which is running the dd-wrt firmware. If you don't already know about this great firmware, check out the link... its basically a way to turn a cheap router into a priceless routing monster. To add the serial port, I used a Logic Level Converter to convert the 5V serial messages coming from the Arduino to 3.3V, which is what the router is expecting.
I used the BOB-08745 chip from SparkFun Electronics (A great deal for about $1.50). Took a a few days to get to my house, but once here, wired it up and it started working right away.

If you decide to go with the above chip (In place of the MAX232 chip most commonly used for Serial), pay close attention to the RXO / RXI / TXO / TXI. It is a bit confusing which wires go where on this chip since it's about the size of a dime and a bit hard to read. Basically, on the HV (High Voltage) side, connect ground and a 5V connection from the Arduino, on RXI, connect the TX from the Arduino. On the TXO, connect the RX from the Arduino. (Yes you understand correctly... RX to TX, and TX to RX... confusing much?). Then, on the LV (Low Voltage) side from the router, connect the 3.3V and Ground connections from the router, and then on TXI, connect TX from the Router, and on RXO, connect RX from the router.
Some more technical notes about which caused me a lot of pain in figuring out... Make sure to use a DD-WRT Firmware that supports JFFS. This is required so that you can install the very necessary ipkg to the router: setserial. Setserial is a command line tool that I needed to use in order to set the baudrate to 9600 for the serial port (/dev/tts/1) and set the irq to 3.
My very strong suggestion is to use this firmware in particular from dd-wrt.org (If using the WRT54GL v1.1 Router...):
DD-wrt Mini Generic V24 SP1

Once serial communication was working, I set out looking for a way to stimulate the serial interface on the router via network messages, rather than having to ssh into the routher and running Serial commands manually...
This is how I currently control the robot through the router:
To set up the TCP interface, I am following the advice from Andrew Hazelden (here), which uses ser2net to map a TCP port to the serial interface on router boot up.
So long story short... I'm wire free.

I managed to add a serial port to my already 'enhanced' WRT54GL Linksys router, which is running the dd-wrt firmware. If you don't already know about this great firmware, check out the link... its basically a way to turn a cheap router into a priceless routing monster. To add the serial port, I used a Logic Level Converter to convert the 5V serial messages coming from the Arduino to 3.3V, which is what the router is expecting.
I used the BOB-08745 chip from SparkFun Electronics (A great deal for about $1.50). Took a a few days to get to my house, but once here, wired it up and it started working right away.

If you decide to go with the above chip (In place of the MAX232 chip most commonly used for Serial), pay close attention to the RXO / RXI / TXO / TXI. It is a bit confusing which wires go where on this chip since it's about the size of a dime and a bit hard to read. Basically, on the HV (High Voltage) side, connect ground and a 5V connection from the Arduino, on RXI, connect the TX from the Arduino. On the TXO, connect the RX from the Arduino. (Yes you understand correctly... RX to TX, and TX to RX... confusing much?). Then, on the LV (Low Voltage) side from the router, connect the 3.3V and Ground connections from the router, and then on TXI, connect TX from the Router, and on RXO, connect RX from the router.
Some more technical notes about which caused me a lot of pain in figuring out... Make sure to use a DD-WRT Firmware that supports JFFS. This is required so that you can install the very necessary ipkg to the router: setserial. Setserial is a command line tool that I needed to use in order to set the baudrate to 9600 for the serial port (/dev/tts/1) and set the irq to 3.
My very strong suggestion is to use this firmware in particular from dd-wrt.org (If using the WRT54GL v1.1 Router...):
DD-wrt Mini Generic V24 SP1

Once serial communication was working, I set out looking for a way to stimulate the serial interface on the router via network messages, rather than having to ssh into the routher and running Serial commands manually...
This is how I currently control the robot through the router:
Listinging to messages from robot:
#cat < /dev/tts/1
Sending Messages to the robot:
#echo 1E > /dev/tts/1
To set up the TCP interface, I am following the advice from Andrew Hazelden (here), which uses ser2net to map a TCP port to the serial interface on router boot up.
So long story short... I'm wire free.

Subscribe to:
Posts (Atom)