Friday, October 21, 2011

My Mower's Morph into his Evil Doppleganger Brother... Senor Wheelbarrow

I threw in the towel on a robot mower for now... The logistics of the whole thing just weren't adding up, and it only takes me 25 min to push mow my lawn now... my guess is using a robot mower would probably double the amount of time it actually takes me to mow, which really makes no sense.

So, instead, I've built myself a robot wheelbarrow! Much more practical... err... ok, so maybe not too practical, but awesome? Yes.


I'm going to test it out this weekend on a bunch of firewood, but the wheel chair is designed to carry the larger boned variety of human beings, so it should be able to carry a pile of old dead logs no problem.

In addition to turning the chair into a wheel barrow, I added two key components:

  • Motorized Lift to provide dumping mechanism

  • Radio Controlled instead of Wifi Controlled


The motorized lift allows me to dump the robots load with no effort on my part. Right now its just a switch duct taped onto the side of the robot, but I have 'big plans' to hook it into the radio controller... when i get time... which is rare.

The radio controller instead of wifi just makes sense. Previously, I had to Power on a router on the chair, connected to its own battery (through an inverter), and then power on my laptop, start a java application, before I could even drive the chair.

With the radio controller, I just power on the chair, and flip on the control box on the chair. Done. The radio is powered off of the arduino's 5V supply, so it didn't even need anything special for power.

I will be selling these for around $2500.00 each (j/k). If you want to purchase one of the worlds most expensive, Yet Practical!, wheelbarrows, just let me know.

Monday, September 12, 2011

How to wire up the Joystick...

I had a request from someone attempting to do this same hack for the wiring diagram of the Joystick to Arduino...

So, I drew this up:

Click to Enlarge


Enjoy!

Sunday, August 14, 2011

A few outdoor tests, a few more problems...

Since there was no rain in the forecast today, I decided to take the robot out around the front lawn for a few tests.

I have decided to hold off on buying an old mower and hooking it up until I am sure the control/video feed will be adequate to drive this around the lawn with a mower attached... There are still a few problems to overcome. (More on that later).

The first video below is a description in pretty good detail of all of the components and how they work together on the robot.


This video is the second part, and gives some detail on driving the robot around, and a bit of a demonstration.


As you'll notice in the videos, I didn't compensate at all for the shakiness of the video feed... I mean it makes sense now. Fixed Camera + Bumpy terrain = Bumpy Camera. I'd prefer a software solution to fix the video's shakiness real-time. They are plenty of great options for post processing (Virtualdub and Deshaker), but those won't do me much good since I need a real-time stream.

I might be able to build a stabilizer that will help a bit, but thats my plan B for now.

The other problem right now with the robot is the oversenstivity of the joystick. I plan to correct this by replacing joystick control with an old PC steering wheel and brake/gas pedals. Right now though, its at the bottom of the list since it'll be an easy drop in fix, whereas the video takes a bit more thinkin'.

Friday, August 5, 2011

First Joyride Around My Basement...

I took the robot 'out' for a spin around the basement now that I've got it all wire(less)ed up. I am pleased to report no major issues and no holes in the drywall!

I apologize for the terrible job video taping... its hard to drive a robot with one hand and video with the other, while you're trying not to destroy your walls.


Forecast is for rain the next few days, but as soon as it clears out, I'm going to do some tests out in the lawn to see how it fairs. You'll notice in the video the robot is a little back heavy (The front wheels seem to float). That is actually by design, as one I hook the mower to the front, it should even out a bit.

100101001100100101 (Source Code)


I decided to go ahead and share my work thus far via a google code project. I'm not exactly sure how useful any of this is going to be because my code is very much dependent on the Quickie P-220 wheelchair joystick which I've hacked... which means, in order to really use this code, not only will you have to get ahold of that particular wheelchair; but you'll have to hack into the controller in the same way I did... (And build the Arduino Shield I built... and Hack your wrt54g router... and... and....)

Get the picture?

Ok, enough chitter chatter. Here is the source code for both the Arduino and Java TCP Base station (Control Center):
Google Code Mowstation Trunk

Oh, also, I wanted to mention that I've solved my issue with the robot wandering off when power was lost... Previously I had the arduino powered through a portable energizer, and just the webcam and router powered through the inverter... which meant, I could lose power to the router, but the arduino would still stay on (And keep driving the motors).

I fixed this by purchasing a separate 12V battery from walmart for 20 bucks (Not the biggest battery in the world mind you... but it was a 'lawn and garden' battery, which seemed fitting for a robot mower). I then hooked the inverter up to that battery and made use of the two AC ports for webcam / router, and this inverter also has a USB port, which I plugged the arduino directly into.


Oh wow! A new battery for me??


Now I just need to start choppin' some metal and weld this beast together so that it can support the weight of a mower... this will be interesting.

Thursday, August 4, 2011

Oh Robot, You're a Needy Little Guy Aren't You?

I managed to make some fantastic progress with the whole wireless commanding of the robot... in fact, for the most part, that interface is done. As mentioned in the last post, I ended up going for serial commands over a TCP interface using a hacked wrt54g router and ser2net. My TCP client (Which has a joystick connected and is really the cockpit for the mower) was written in java and works very well. If anyone is interested in sourcecode, just let me know.


Isn't he a cutie?


The real challenge of late has been my revisit of powering the robot... I purchased a great cheap inverter off Amazon 
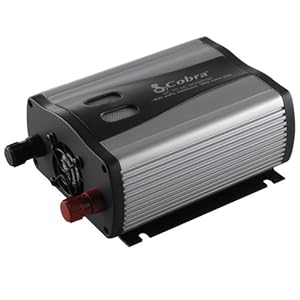
and tied it into the 12V batteries of the wheelchair. When I first powered it on, I thought I had just solved my last major hurdle, and was ready to attach a murderizingly dangerous spinning lawn mower blade and set this guy off to work... oh man. Thank God for testing.

I started up my TCP client and grabbed my joystick, time to tear rubber around the basement. I push the throttle forward and the robot takes off. Hold on... why is this thing beeping very loudly at me? I didn't install a speaker. Oh, its the inverter... I guess that's normal. Maybe its the robots way of communicating with me, "Let me go faster papa". Ok robot, whatever you want.... Throttle Up.... Oh good, the beeping stopped.... wait, why is the robot not stopping? Oh... Uh... Shit.

So, apparently the 12v battery does a great job at holding the robot at idle while running the inverter. The problem is, once the motors kick on, there isn't enough juice left to power the inveter... hence, my router, wireless camera and method of controlling & killing the robot remotely was lost. Fortunately, I tested with the robot in eyesight, and was able to run and hit the kill switch I'd installed on the robot itself, literally inches from another hole in the drywall.

I had thought I installed adequate safeguards incase this happened... but my command timeout was set to 4000 milliseconds. Which means, the robot will do a whole 4 SECONDS of ghost riding before shutting itself down when communication is lost. Plenty of time to drive through that wall, or demolish a family of bunnies. I'm changing the timeout to 50ms to prevent this mistake again.

As for my power situation, I'm going to get a cheap 12v 7ah battery on this thing to run my electronics... separate from the motor batteries. Hope it's enough to power an inverter.

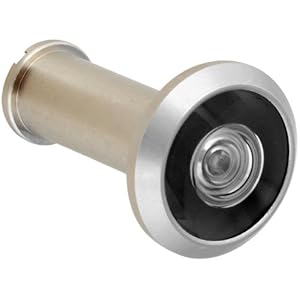
Also, I've decided what I really need is more views of the robot while its cruising. So I decided to customize my own wide angle web cams. I bought a couple door peep holes from amazon for 6.99 that I'm going to hot glue to some old web cams I have stashed around, and send the USB commands over Ethernet back to the base station using this nifty gadget microcenter has on sale.


For now... the beast sleeps in the basement, ready to rise again soon.

Monday, August 1, 2011

Wires? We Don't Need no Stinkin' Wires.

Finally. This was a long time comin' but as of last night, the robot is finally completely wireless.

I managed to add a serial port to my already 'enhanced' WRT54GL Linksys router, which is running the dd-wrt firmware. If you don't already know about this great firmware, check out the link... its basically a way to turn a cheap router into a priceless routing monster. To add the serial port, I used a Logic Level Converter to convert the 5V serial messages coming from the Arduino to 3.3V, which is what the router is expecting.

I used the BOB-08745 chip from SparkFun Electronics (A great deal for about $1.50). Took a a few days to get to my house, but once here, wired it up and it started working right away.


If you decide to go with the above chip (In place of the MAX232 chip most commonly used for Serial), pay close attention to the RXO / RXI / TXO / TXI. It is a bit confusing which wires go where on this chip since it's about the size of a dime and a bit hard to read. Basically, on the HV (High Voltage) side, connect ground and a 5V connection from the Arduino, on RXI, connect the TX from the Arduino. On the TXO, connect the RX from the Arduino. (Yes you understand correctly... RX to TX, and TX to RX... confusing much?). Then, on the LV (Low Voltage) side from the router, connect the 3.3V and Ground connections from the router, and then on TXI, connect TX from the Router, and on RXO, connect RX from the router.

Some more technical notes about which caused me a lot of pain in figuring out... Make sure to use a DD-WRT Firmware that supports JFFS. This is required so that you can install the very necessary ipkg to the router: setserial. Setserial is a command line tool that I needed to use in order to set the baudrate to 9600 for the serial port (/dev/tts/1) and set the irq to 3.

My very strong suggestion is to use this firmware in particular from dd-wrt.org (If using the WRT54GL v1.1 Router...):
DD-wrt Mini Generic V24 SP1


Once serial communication was working, I set out looking for a way to stimulate the serial interface on the router via network messages, rather than having to ssh into the routher and running Serial commands manually...

This is how I currently control the robot through the router:
Listinging to messages from robot:
#cat < /dev/tts/1

Sending Messages to the robot:
#echo 1E > /dev/tts/1

To set up the TCP interface, I am following the advice from Andrew Hazelden (here), which uses ser2net to map a TCP port to the serial interface on router boot up.

So long story short... I'm wire free.

Wednesday, July 27, 2011

It Seemed Like a Good Idea at the Time...

So, today was supposed to be the day I tackled mobile power on the robot... You know, getting this thing to drive around without a tail.

I decided the best way to do this would be to build my own power supply, running off the 24V batteries from the wheelchair... Great Idea! Right? ... No.


Two fires later, I've learned I am absolutely not an authority when it comes to building power supplies... In fact, I could easily give lessons, quite well, on how NOT to build a power supply.

The real problem was I bought this great little case enclosure for all of my electronics, and thought to my self, "You MUST build a power supply that will fit within this box, alongside the Arduino and Interface controller to drive the chair." Afterall, a robot isn't a robot unless its purty as well.


I bought myself the wrong size capacitors, which caused one to blow up... LITERALLY. I didn't even know that was possible.

After I beefed those up, I plugged in the joystick, using a stick to turn on the power supply... (That should have been the first red flag, no? I mean... if you don't even want to touch what you just built...) To my surprise, the power supply came to life! Hooray!... Or, wait, no. Why does it smell like smoke? Apparently I shorted out the ground to the joystick and the actual wheel chair joystick was now on fire.


After quickly turning off power and assessing damage, it appeared to have just been a wire that burnt up... cleaned that up, replaced the wire and the chair now starts again... with out my power supply.

I'm in the process of finding the short now, and then will start looking for a bigger stick to turn it on.

Monday, July 25, 2011

Its Alive!

So, I made a fair bit of good progress the last few days. I now have full control over the wheelchair motors, via the joystick. This was by far, the hardest part of the hack. Basically, I went with the approach of hacking the joystick of the wheelchair itself, rather than the motors. However, this proved to be difficult because the technical specs of the Joystick did not match the way the wheelchair was using it.


Video explaining the hack a bit


Basically, pins on the joystick are numbered 1-10, and while the wheelchair controller board does have numbers on them, they are not in that order.

Additionally, the wheelchair board seems to have a fair bit of 'protection' logic in place to keep the joystick from being hacked. It requires constant voltage, and the right synchronization in order to initialize.... Luckily, I devised a simple solution to this.

I added two switches (Each DPDT controlling the dual channels necessary for Front/Back and Left/Right Control), which interrupt the signal from the joystick when the arduino is ready to start sending commands. This allows the arduino to come up and stablize voltage to prevent the Joystick on the wheelchair from suspecting anything has gone ary. However, the arduino itself proved to be a bit of a pain because the PWM digital output pins on the arduino are NOT ALL CREATED EQUAL. More specifically, pins 10, 11, 3 and 9 are the only pins on the arduino that do PWM at the correct frequency necessary to drive the chair.

All of this is of course configurable in the arduino library itself... but having had no idea about this ahead of the time, I wasted a lot of time poking at it.

Once the arduino was able to send commands to the motors to control them, the rest of this hack has been gravy. I added a java app to send serial commands to the arduino, and integrated an old joystick I had to control the wheelchair.

My next step is to hack my WRT54GL router, adding a serial port, and using that as a base station on the mower to make it wireless. The only other things after that are finding a good way to power the wireless camera and router from the wheelchair; and attaching a mower.

Here is a video of all the pieces together: (I of course forgot to take video when I drove this thing into the drywall in the basement... :) )


This thing is seriously going to kill someone.


Note to self... test outside.

Thursday, July 21, 2011

I'm going to call this progress.

So, I managed to patch into the controller for the joystick and took a quick video to show progress.


The hardest part of this so far was using the wrong set of transistors (Which are being used to digitally simulate a button press on the controller). I was using medium power, when I needed to be using the BC108 low power transistors.

This is because the switches on the controller itself are going off 3.3v, and I was trying to switch them using a 5v signal from the arduino. I swapped to low power transistors, and threw in a resistor to reduce the voltage going into the transistor, and now it works a charm.

I also wasted a fair bit of time digging out the spec for the joystick from the archives of the internet, which basically tells me, I need to look for an easier way to control the motors than trying to replicate the joystick itself.

See the spec for the joystick here:
D50800-03 Specification

More progress soon I hope.

Monday, July 18, 2011

We have a wheelchair... and data sheet!

So, I've managed to purchase a great working wheelchair off craigslist, for $150 USD. Really, a steal if you ask me:

Quickie P-220

(Mine is actually black, with sparkles!)


I disassembled the chair after confirming it works, and took apart the joystick... this is going to be an easy hack I think... (dangerous last words, I know.) I managed to find the datasheet for the joystick online, so the plan is to provide a relay or switch of some sort to swap between joystick control, and arduino control. When running off the arduino, I will simply replicate the interface.


(Purty picture of disassembled joystick)


Also, here is the base of the wheel chair with motors on the hack-stand for processing.


Coming together!

Thursday, July 14, 2011

Mowstation is a goooo!

I've just started the planning phase for my next project, so I decided to start a blog to document the process.

Basically, I about passed out yesterday mowing in 100+ weather, and thought to myself... "Self, this blows. There has to be a better way.".

I've long considered the idea of creating an RC mower... but even with that, you still have to stand outside, which is stupid. I mean really, whats the point of having a remote mower if you have to stand in eye sight and watch it mow.

Mowstation is going to be a totally different way of mowing. You will sit yourself in a mowpit (Think video game cockpit) inside your house (Its air conditioned after all). The mowpit will control all aspects of the mower, using a steering wheel, break/gas pedals, and live video/sensor monitoring, and gps tracking of the mower.

Here is my current parts list:
Mowbot:
*Electric Wheel Chair
*Wireless N Camera
*Arduino w/Relay to control Motors (And Motor controller for speed etc...)
*Small Base Station Laptop, with Wireless N, and USB to connect to Arduino
*Mower
*GPS Sensor, Temp Sensor

Mowpit:
*Large 25" Monitor
*Steering Wheel
*Foot Pedals
*Throttle Joystick
*PC With Wireless N

There will be a fair bit of code to write to support all of this, but that's the fun part. Essentially, there will be server code (running at the mowpit) and client code (running on the mowbot).

More details coming soon!